Wednesday 1 August 2012

How to change Add New item Link in sharepoint 2010

Type -1:

To customize the SharePoint 2010 List 'Add New Item link' Please add the below JavaScript in your list AllItems.aspx page.

All webparts will have their own ID's. So you will have to modify the Custom List webpart with the webpart ID.
Please see this link for detailed information about ID's of Webparts.


Edit the page using with SharePoint Designer. and find the ID="PlaceHolderMain" and add the JavaScript before the end tag "</asp:conten>".

Here is the jscript
<script>
var ttnA = document.getElementsByTagName('A');
for (var j=0; j<ttnA.length; j++)
{
  if (ttnA[j].id == 'idHomePageNewItem')
  {
      { ttnA[j].innerHTML='Add your Request from here' }
  }
}
</script>


Type - 2:

To change 'Add New Item' text for Lists or Libraries from SitePages(Some times List webparts may use in SitePages depends on requirement.)

For SP2010,   
  • Using with SharePoint Designer open the 'AllItems.aspx' or 'SitePages/Page.aspx' (Particular List webpart located page) .
  • Go for the Design portion of the List View section and click on the '>' portion where you see 'Add new item'
  • Then click on Hyperlink options and click yes when the Dialog box comes up.

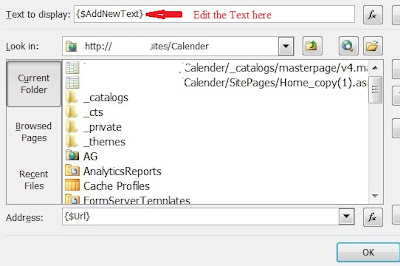
  • At the top you will see 'Text to display: {$AddNewText}'  Edit the text here to whatever you want for example 'Add your Request here'
 

Monday 2 July 2012

Export SharePoint ListItem to PDF file

Before one month this one is my major task, i did much research about this area. But i didn't found any links about to Print the SharePoint ListItems based on conditions. Finally got the output using with the iTextSharp library. It is a free downloadable library that is use for pdf generation with ListItems or any data.
Here is the steps i followed,
  • Here i wrote the code for below requirement :
    "I need to export the SharePoint List Item, Picture & its Barcode image with Barcode value.
    My intention is when user click on the item link the pop up window of DispForm.aspx page will appear with 'Export to PDF' button in top left. So user will click the button then PDF file will be genrate."

  • First you should download iTextSharp dll files from here
  • you must create a SharePoint project in VS 2010, and add this(itextsharp.dll) reference to the project.
  • Then create a visual webpart with any name, here i am giving ExportItemtoPDF and add a button in design page.
Make sure use the following namespaces in your code
using Microsoft.SharePoint;
using System.IO;using Microsoft.SharePoint.WebControls;using iTextSharp.text;using iTextSharp.text.pdf;using System.Text;namespaces will genrate like as below


Please add the below code in button click event.
try
{
using (MemoryStream ms = new MemoryStream()) {
//Opening the current site
SPSite oSiteCollection = SPContext.Current.Site;
//Fetching the current list
SPList oList = oSiteCollection.OpenWeb().Lists["PrintListItem"];
// Creae the document object, assigning the page margins
Document document = new Document(PageSize.A4, 25, 25, 30, 30);
PdfWriter writer = PdfWriter.GetInstance(document, ms);

// Open the document, enabeling writing to the document
document.Open();PdfContentByte cb = writer.DirectContent;
//barcode
Barcode128 bc = new Barcode128();

//Giving heading to the Word Document with style
StringBuilder strHTMLContent = new StringBuilder();
strHTMLContent.Append(SPContext.Current.Item["Title"].ToString());
strHTMLContent.Append("\r\n" + SPContext.Current.Item["body"].ToString()); strHTMLContent.Append("\r\n" + SPContext.Current.Item["value"].ToString());
imagefilepath = SPContext.Current.Item["Picture"].ToString().Replace(",", "").Trim();
iTextSharp.text.Image jpg = iTextSharp.text.Image.GetInstance(imagefilepath);jpg.ScaleToFit(120, 80);

string code = SPContext.Current.Item["Barcode Value"].ToString();
bc.ChecksumText = true;
bc.GenerateChecksum = true;
bc.StartStopText =true;
bc.Code = code;

document.Add(new Paragraph(System.Text.RegularExpressions.Regex.Replace(strHTMLContent.ToString(), @"<(.|\n)*?>", string.Empty)));
document.Add(bc.CreateImageWithBarcode(cb, null, null));
document.Add(jpg);

document.Close();
writer.Close();
ms.Close();
Response.ContentType = "pdf/application";
string strFileName = SPContext.Current.Item["Title"].ToString() + ".pdf";
Response.AddHeader("content-disposition", "attachment;filename=" + strFileName);
Response.OutputStream.Write(ms.GetBuffer(), 0, ms.GetBuffer().Length);
}
}

catch(Exception ex){
}

This is the output


I tried with Barcode 39 type but i am getting special characters in the end of barcode value. I need to find more informatin about using Barcode 39 type in SharePoint.

Please check this link to Export SharePoint List items to Word Document.
I used above link, but i am not able Export the Barcode Image. Getting the Image Path and Value only.

For complete discussion about my issue please have a look  in MSDN forums.

Wednesday 27 June 2012

How to find Site Collection size in SharePoint 2010

To get the Size (in MB) of all Site collections in your SharePoint 2010 Farm

You can use STSADM commands and Powershel script.

STSADM Cmd:

Please navigate to below path

C:\Program Files\Common Files\Microsoft Shared\Web Server Extensions\14\BIN
and type as    STSADM.exe -o enumsites -url htt:// SharePoint Site

check for detailed information here


2. By using with PoweShell script
Open SharePoint 2010 Management Shell as administrator

---> $sc = Get-SPSite http://sharepointsite/
---> $sc.usage
this will give you the output like as below


If you want to know about the storage of Site Collection only then use the below script

Get-SPSite | select url, @{label="Size in MB";Expression={$_.usage.storage/1MB}} | Sort-Object -Descending -Property "Size in MB" | Format-Table -AutoSize

the above script will give you the site collection size in megabytes.


If you want a copy of site collections size properties in html file, then please use below script

Get-SPSite | select url, @{label="Size in MB";Expression={$_.usage.storage/1MB}} | Sort-Object -Descending -Property "Size in MB" | ConvertTo-Html -title "Site Collections sort by size" | Set-Content SizeReport.html

to overcome the yellow color warning message please use the parameter as -Limit ALL

Get-SPSite -Limit ALL | select url, @{label="Size in MB";Expression={$_.usage.storage/1MB}} | Sort-Object -Descending -Property "Size in MB" | ConvertTo-Html -title "Site Collections sort by size" | Set-Content SizeReport.html

For find out storage space allocation's and Increase Storage please check with below links FYI.,
http://blogs.msdn.com/b/sowmyancs/archive/2008/11/15/how-to-find-out-the-storage-space-allocation-details-a-site-through-code.aspx
http://social.technet.microsoft.com/forums/en-US/sharepointadmin/thread/d6cb11d9-6ed2-4344-aac9-4ca72d8b2c40
http://blogs.officezealot.com/mauro/archive/2005/03/25/4425.aspx
http://sharepointyankee.com/2011/12/28/how-much-storage-space-is-my-site-collection-using/

Friday 22 June 2012

Rename SharePoint webapplication and SharePoint standalore server names

Rename SharePoint 2010 web application :

If anybody would like to rename a SharePoint 2010 web application name to correct the misspellings, you can simple PowerShell script.

The following script would rename the SharePoint application name only, not to IIS site and the Application pool,

First create PowerShell file(.ps1) with notepad by using with below code

$rwa=Get-SPWebApplication | where {$_.Name -match "Old Web Application Name"}
$rwa.Name
$rwa.Name="New Web Application Name"
$rwa.Update()
Get-SPWebApplication | where {$_.Name -match "New Web Application Name"}

Just save in under D:\renameapp.ps1 on your SharePoint 2010 server.
Open SharePoint 2010 Management Shell as Administrator mode, and do as like below screen shot


Go to Central Admin--> Manage web application--> here you should able to see the Web application with updated new name.

Rename SharePoint standalone server  :

Rename a stand-alone server by using with below Windows Powershell

Rename-SPServer [-Identity] <OriginalServerName> -Name <NewServerName>
To ensure that the rename operation is complete, run iisreset /noforce at a Windows command prompt
For detailed information and precess about Renaming the SharePoint standalone server name see this technet library.

Read More option for SharePoint Blog posts.

In my blog site while user reading the posts, users are not Familiar to read long posts and for checking all posts he needs to scrool page continiously.

SharePoint blog does not provide a feature to restrict lines or characters to display the content.

After much researching i found the solution from this blog

To display blog post content in limited size :
  1. Take a backup of blog.xsl file from C:\Program Files\Common Files\Microsoft Shared\Web Server Extensions\14\TEMPLATE\LAYOUTS\XSL
  2. Edit the file and go to around line 15, here we will add the JQuery Source code.
  3. Naviage to http://jquery.com/ and copy the JQuery source code from "downlod JQuere"
  4. I have copied http://code.jquery.com/jquery-1.7.2.js source code and pased between CDATA Tags.
<!--<xsl:template match="View[@BaseViewID='0' and List/@TemplateType='301']" mode="full">
<script type="text/javascript">
<![CDATA[
   /*!
   * jQuery JavaScript Library v1.7.2
   * http://jquery.com/
   *
   * Copyright 2011, John Resig
   * Dual licensed under the MIT or GPL Version 2 licenses.
   * http://jquery.org/license
   *
   * Includes Sizzle.js
   * http://sizzlejs.com/
   * Copyright 2011, The Dojo Foundation
   * Released under the MIT, BSD, and GPL Licenses.
   *
   * Date: Wed Mar 21 12:46:34 2012 -0700
   */
   (function( window, undefined ) {
   ..............
   ..........//
   })( window ); ]]>
</script>
<xsl:apply-templates select="." mode="RenderView" />
<xsl:apply-templates mode="footer" select="." />
</xsl:template>
-->
      
CDATA Tag: The term CDATA is used about text data that should not be parsed by the XML parser

--> Next just find the class for  class="ms-PostBody"  and add the below script

<!--<xsl:if test="$ShowBody=1">
<div class="ms-PostBody">
<div>
<xsl:apply-templates select="$Fields[@Name='Body']" mode="PrintField">
<xsl:with-param name="thisNode" select="$thisNode"/>
<xsl:with-param name="Position" select="$Position"/>
</xsl:apply-templates>
<script type="text/javascript">
<![CDATA[
$(".ms-PostBody[rendered!='done'] > div > div").each(function(){
if($(this).text().length > 400) {
text = $(this).text().substring(0, 400);
$(this).html(text + "... " + "<a href='" + $(this).parent().parent().parent().find(".ms-PostTitle a").attr("href") + "'>Read More</a>");
}
}).attr("rendered","done");
]]>
</script>
</div>
</div>
</xsl:if>
--> --> Now upload this blog.xsl file into your sharepoint site style library, After that navigate to default.aspx page,edit the blog post webpart and add the xsl file url into "Miscellaneous" secrion--> XSL Link.

http://sitename/Style%20Library/blog_new.xsl

Once the precess is finished your blog posts will looks like this


Thursday 21 June 2012

Create Web Application with Powershell script

Recently when i am creating SharePoint webapplication using with Central Admin i am facing 'The page can not be displayed' error. If i check with SharePoint webapplicatin it has created but the content database not created properly.

Then i have decided to use simple script for creating new Webapplication in SharePoint.
Below script is for creating New SharePonint Webapplication. ContentDatabase will create automatically for with below script.

New-SPWebApplication -Name "SiteName" -ApplicationPool "ApplicationPoolName" -ApplicationPoolAccount Domain\admin -Port 1133 -URL "http://servername/"


Wednesday 23 May 2012

How to check SharePoint 2010 installation type

For getting SharePoint installation type in your SharePoint farm this is the quick way to check the SharePoint installation type.

1. Open regedit.exe from windows button --> type regedit
   and navigate to HKEY_LOCAL_MACHINE\SOFTWARE\Microsoft\Shared Tools\Web Server Extensions\14.0\WSS


2. In WSS check your " ServerRole "
   Here you can get your ServerRole which type of your installation

   SINGLESERVER is knows as - Stand Alone

   APPLICATION - Farm Complete

   WFE - Web Front End
 

Wednesday 16 May 2012

Hide the SharePoint ribbon from anonymous users and in SharePoint List display page


For hide the SharePoint ribbon from anonymous users we can use below STYLE in masterpage 
AnonymousTemplate.
  
<style type="text/css">
body #s4-ribbonrow {
display: none;
}
</style> 
 
Example 1: 
 
<asp:LoginView id="LoginView2" runat="server" >
<AnonymousTemplate>
<div class="customLogin"> 
<a href="/_layouts/authenticate.aspx"><span class="style3">Login</span></a>
</div>  
<style type="text/css">
body #s4-ribbonrow {
display: none;
}
</style>
</AnonymousTemplate>
<LoggedInTemplate> 
<style type="text/css">
.customLogin {
display: none;
}
</style>
</LoggedInTemplate>
</asp:LoginView>
 
 
and sometimes SharePoint lists may have a workflows for update and insert the items, so this time Ribbon features will visible to users like edit, new item, delete like that.
User should have update skills through workflow but he should not have editable features in ribbon. So you will have to remove/hide the ribbon for user view.
 
 
In order to completely hide the ribbon either add Content Editor Web part and you can add the below script in Content Editor Web part html source
I don’t want to display the ribbon in list item display page, so i have added CEWP in DispForm.aspx page and added below script in it.

<script type="text/javascript">
        document.getElementById("s4-ribbonrow").style.display = "none";
    </script>