- SPFx Solution didn't support elevated permission using
App-Only authentication, but with MS Power Automate, it's possible to
use app-only elevated permission.
- App-Only Token and elevated permission is got in MS Flow and
in SPFX solution only call the flow using HttpClient object.
- For example, in public facing sites Contact Us form, where a
user will not have direct access to view or edit other items but he/she should
be able to make an entry(create item) into the list. So even if the user don't
have access to the list, you would like to collect information from them.Below is the Architecture diagram from Microsoft:
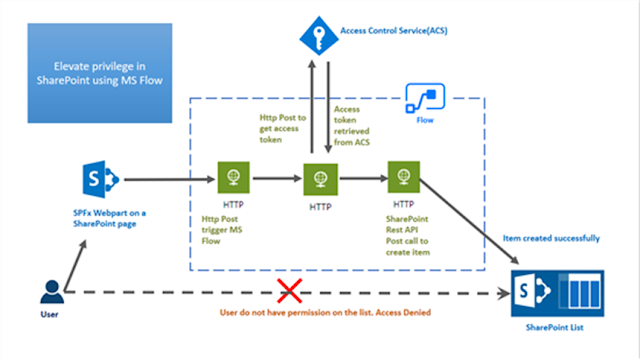
- Here in the diagram, user does not have access
to the list but to input the data an interface has been provided which is build
using SPFx webpart.
- User makes a POST request from SPFx webpart
which triggers the MS Flow.
- Flow(HTTP) makes a POST request to ACS to
retrieve the Access token.
- Once the ACS token received, SharePoint REST API
POST call will perform using the token and that will create the item in
SharePoint list.
Make REST API Call from MS Flow:
Create and register an App in SPO with full control permissions
1.
Login to SPO https://domainname.sharepoint.com/sites/LiakathDev/_layouts/15/appregnew.aspx
to generate Client ID and Secret ID.
2.
Go to https://domainname.sharepoint.com/sites/LiakathDev/_layouts/15/appinv.aspx
and register the app by entering the generated Client ID via lookup. Add the
below XML to provide the full permissions to app and to elevate the permission
at list level.
<AppPermissionRequests AllowAppOnlyPolicy="true">
<AppPermissionRequest Scope="http://sharepoint/content/sitecollection/web/list
" Right="FullControl" />
</AppPermissionRequests>
3. Select the list from the dropdown list where you need elevated permission
and click on ‘Trust It’.
4. Verify the registered app and Note the Tenant ID from the below
link:
https://domainname.sharepoint.com/sites/LiakathDev/_layouts/15/appprincipals.aspx
Create Power Automate Flow
1.
Create flow from blank template and select the
trigger as “When a Http request is received” and add the below JSON in the ‘Request
Body’:
{
    "type": "object",
    "properties": {
        "title": {
            "type": "string"
        }
    }
}
2.
Add action ‘HTTP’ post to fetch the access token
from ACS using REST API call.
Body: replace Client ID, Secret ID and
Tenant ID.
Grant_type=client_credentials&client_id=<<ClientID>>@<<TenantID>>&client_secret=<<ClientSecretID>>&resource=00000003-0000-0ff1-ce00-000000000000/<<TenantName>>.sharepoint.com@<<TenantID>>
3.
Add action “Parse JSON” and include the below JSON in to read the
access token.
{
"type": "object",
"properties": {
"token_type": {
"type": "string"
},
"access_token": {
"type": "string"
}
}
}

4. Make Rest API call using Power Automate Flow
a.
Add action “HTTP” post to make a REST API call.

5. Add action "Response" to send a
response back based on the out received from the previous step. Include Status
code in the body parameter as displayed in the screenshot below.
6.
Save the Flow and Note the URL of the HTTP Request:
HTTP Post URL
https://prod-19.centralindia.logic.azure.com:443/workflows/02f9d3f348ec4f8ebee1f70be0b608f8/triggers/manual/paths/invoke?api-version=2016-06-01&sp=%2Ftriggers%2Fmanual%2Frun&sv=1.0&sig=XpvU6D81LOSEtAH3Nvl_qKeYfEWNnyvqU9v6JnsPzbs
Call Power Automate Flow From SPFx webpart:
Create SPFx webpart
1.
Create SPFx webpart and the template is: No framework.
2.
Once the project is created open the VS Code
using this command : Code .
3.
Update the Webpart.ts file with the below code
import { Version } from '@microsoft/sp-core-library';
import {
  IPropertyPaneConfiguration,
  PropertyPaneTextField
} from '@microsoft/sp-property-pane';
import { BaseClientSideWebPart } from '@microsoft/sp-webpart-base';
import { IReadonlyTheme } from '@microsoft/sp-component-base';
//import { escape } from '@microsoft/sp-lodash-subset';

import styles from './SpFxWebpartWebPart.module.scss';
import * as strings from 'SpFxWebpartWebPartStrings';
import { HttpClient, IHttpClientOptions, HttpClientResponse } from '@microsoft/sp-http';

export interface ISpFxWebpartWebPartProps {
  //description: string;
  flowURL: string;
  FlowURLLabel: string;
}
//import { SPComponentLoader } from '@microsoft/sp-loader';
//interface IResult {
  //status: string;
//}

export default class SpFxWebpartWebPart extends BaseClientSideWebPart<ISpFxWebpartWebPartProps> {

  //private _isDarkTheme: boolean = false;
  //private _environmentMessage: string = '';

  public render(): void {
    this.domElement.innerHTML = `
    <div class="${ styles.spFxWebpart }">
        <div class="${ styles.container }">
          <div class="${ styles.row }">
            <div class="${ styles.column }">
                 <span class="${styles.title} ms-Grid-col ms-u-sm12 block">
                   Item creation using SPFx & Flow
                </span>
                <div class="ms-Grid-col ms-u-sm12 block"><br/></div>
                <div class="ms-TextField ms-Grid-col ms-u-sm12 block">
                  <label class="ms-Label ms-Grid-col ms-u-sm4 block">Title</label>
                  <input id="spfxflowIm" class="ms-TextField-field ms-Grid-col ms-u-sm8 block" value="" type="text" placeholder="">
                </div>
                <div class="ms-TextField ms-Grid-col ms-u-sm12 block"><br/></div>
                <div class="ms-TextField ms-Grid-col ms-u-sm6 block"></div>
                <div class="ms-TextField ms-Grid-col ms-u-sm6 block">
                <button class="${styles.button} create-Button">
                <span class="${styles.label}">Create Item</span>
                </button></div>
                <div id="status"></div>
              </div>
            </div>
          </div>
        </div>
      </div>`;
      this.setButtonsEventHandlers();
  }

  private setButtonsEventHandlers(): void {
    const webPart: SpFxWebpartWebPart = this;
    this.domElement.querySelector('button.create-Button')!.addEventListener('click', () => { webPart.createItem(); });
  }

  private createItem(): void {
    let result: HTMLElement = document.getElementById("status")!;
    let responseText: string = "";
    //result.style.color = "white";
    result.innerText = "Updating item...";
    var itemTitle : string = (<HTMLInputElement>document.getElementById("spfxflowIm")).value;
    const postURL = this.properties.flowURL;
    const body: string = JSON.stringify({
      'title': itemTitle,
    });
    const requestHeaders: Headers = new Headers();
    requestHeaders.append('Content-type', 'application/json');
    requestHeaders.append('Cache-Control', 'no-cache');
    const httpClientOptions: IHttpClientOptions = {
      body: body,
      headers: requestHeaders
    };
    this.context.httpClient.post(
      postURL,
      HttpClient.configurations.v1,
      httpClientOptions).then((response: HttpClientResponse) => {
        response.json().then((responseJSON: JSON) => {
          responseText = JSON.stringify(responseJSON);
        result.innerText = (responseText=="201")?"Item updated successfully":"Error received while updating item";
      });
    }).catch ((response: any) => {
      let errMsg: string = `Error = ${response.message}`;
      result.style.color = "red";
      console.log(errMsg);
      result.innerText = errMsg;
    });
}


  protected onInit(): Promise<void> {
    return this._getEnvironmentMessage().then(message => {
      //this._environmentMessage = message;
    });
  }


  private _getEnvironmentMessage(): Promise<string> {
    if (!!this.context.sdks.microsoftTeams) { // running in Teams, office.com or Outlook
      return this.context.sdks.microsoftTeams.teamsJs.app.getContext()
        .then(context => {
          let environmentMessage: string = '';
          switch (context.app.host.name) {
            case 'Office': // running in Office
              environmentMessage = this.context.isServedFromLocalhost ? strings.AppLocalEnvironmentOffice : strings.AppOfficeEnvironment;
              break;
            case 'Outlook': // running in Outlook
              environmentMessage = this.context.isServedFromLocalhost ? strings.AppLocalEnvironmentOutlook : strings.AppOutlookEnvironment;
              break;
            case 'Teams': // running in Teams
              environmentMessage = this.context.isServedFromLocalhost ? strings.AppLocalEnvironmentTeams : strings.AppTeamsTabEnvironment;
              break;
            default:
              throw new Error('Unknown host');
          }

          return environmentMessage;
        });
    }

    return Promise.resolve(this.context.isServedFromLocalhost ? strings.AppLocalEnvironmentSharePoint : strings.AppSharePointEnvironment);
  }

  protected onThemeChanged(currentTheme: IReadonlyTheme | undefined): void {
    if (!currentTheme) {
      return;
    }

    //this._isDarkTheme = !!currentTheme.isInverted;
    const {
      semanticColors
    } = currentTheme;

    if (semanticColors) {
      this.domElement.style.setProperty('--bodyText', semanticColors.bodyText || null);
      this.domElement.style.setProperty('--link', semanticColors.link || null);
      this.domElement.style.setProperty('--linkHovered', semanticColors.linkHovered || null);
    }

  }

  protected get dataVersion(): Version {
    return Version.parse('1.0');
  }

  protected getPropertyPaneConfiguration(): IPropertyPaneConfiguration {
    return {
      pages: [
        {
          header: {
            description: strings.PropertyPaneDescription
          },
          groups: [
            {
              groupName: strings.BasicGroupName,
              groupFields: [
                PropertyPaneTextField('flowURL', {
                  label: strings.FlowURLLabel
                })
              ]
            }
          ]
        }
      ]
    };
  }
}
4.
Update the en-us.js file with the below code
which is located under ‘loc’ folder (solutionpath > src > webparts >
spFxWebpart > loc).
define([], function() {
return {
"PropertyPaneDescription": "Description",
"BasicGroupName": "Group Name",
"DescriptionFieldLabel": "Description Field",
"AppLocalEnvironmentSharePoint": "The app is running on your local environment as
SharePoint web part",
"AppLocalEnvironmentTeams": "The app is running on your local environment as
Microsoft Teams app",
"AppLocalEnvironmentOffice": "The app is running on your local environment in
office.com",
"AppLocalEnvironmentOutlook": "The app is running on your local environment in
Outlook",
"AppSharePointEnvironment": "The app is running on SharePoint page",
"AppTeamsTabEnvironment": "The app is running in Microsoft Teams",
"AppOfficeEnvironment": "The app is running in office.com",
"AppOutlookEnvironment": "The app is running in Outlook",
"PropertyPaneDescription": "SPFx FLow",
"BasicGroupName": "Flow Properties",
"FlowURLLabel": "Flow URL"
}
});
5.
Update the mystring.d.ts file with the below
code which is located under ‘loc’ colder(solutionpath > src > webparts
> spFxWebpart > loc)
declare interface ISpFxWebpartWebPartStrings {
PropertyPaneDescription: string;
BasicGroupName: string;
DescriptionFieldLabel: string;
AppLocalEnvironmentSharePoint: string;
AppLocalEnvironmentTeams: string;
AppLocalEnvironmentOffice: string;
AppLocalEnvironmentOutlook: string;
AppSharePointEnvironment: string;
AppTeamsTabEnvironment: string;
AppOfficeEnvironment: string;
AppOutlookEnvironment: string;
FlowURLLabel: string;
}
declare module 'SpFxWebpartWebPartStrings' {
const strings: ISpFxWebpartWebPartStrings;
export = strings;
}
6.
Run ‘Gulp Serve’ to test the webpart in
Workbench url.
7.
Add the webpart on workbench url, edit the webpart
and provide URL of the Flow noted in the above step: HTTP Post URL.